Salinko Cafe Manager
This guide covers version 1.1.1. It walks you through setting up a cafe from scratch and explains every page of the app.
1. Install
Salinko Cafe has two parts that come in one installer:
- PC Manager: goes on the counter PC (the cafe owner's or cashier's PC). It holds the customers, packages and sales.
- Lockscreen: goes on every customer PC. It keeps the PC locked until a customer signs in with paid time.
- Download the installer on each PC (Windows 10 or 11, 64-bit).
- Run it and approve the Windows administrator prompt.
- Choose PC Manager on the counter PC, or Lockscreen on a customer PC.
The installer opens the two network ports the customer PCs use to find and reach the manager (UDP 8766 and TCP 8765) in Windows Firewall. Your data is kept in C:\ProgramData\SalinkoCafe\Server, so reinstalling or updating never deletes it.
2. First start
The first time the PC Manager opens it asks for:
- Business name: printed on invoices and receipts.
- Email address (optional): where the daily cash report, receipts and license reminders go.
- Admin username and password: your own login with full access. Keep it safe; there is no default password.
Each time the app starts afterwards, someone must sign in before they can use it.
3. Connect the customer PCs
Nothing to set up: a new Lockscreen looks for the PC Manager on your network by itself and connects to it. Within a few seconds the PC appears on the Dashboard. The PC Manager must be running, and all PCs must be on the same network.
It looks again every time it reconnects, so it keeps working if the counter PC gets a new address.
If a PC doesn't appear
- On the customer PC, sign in to the lock screen with its local admin login and open Settings.
- Under Management Server Connection, click Find now. It shows the PC Manager it found, or says none answered.
- If none answered (some routers block network-wide messages), untick Find the server automatically and type the counter PC's address in Server IP. To find it, open Command Prompt on the counter PC, type ipconfig and note the IPv4 Address (for example 192.168.1.10). Then click Apply.
4. Dashboard
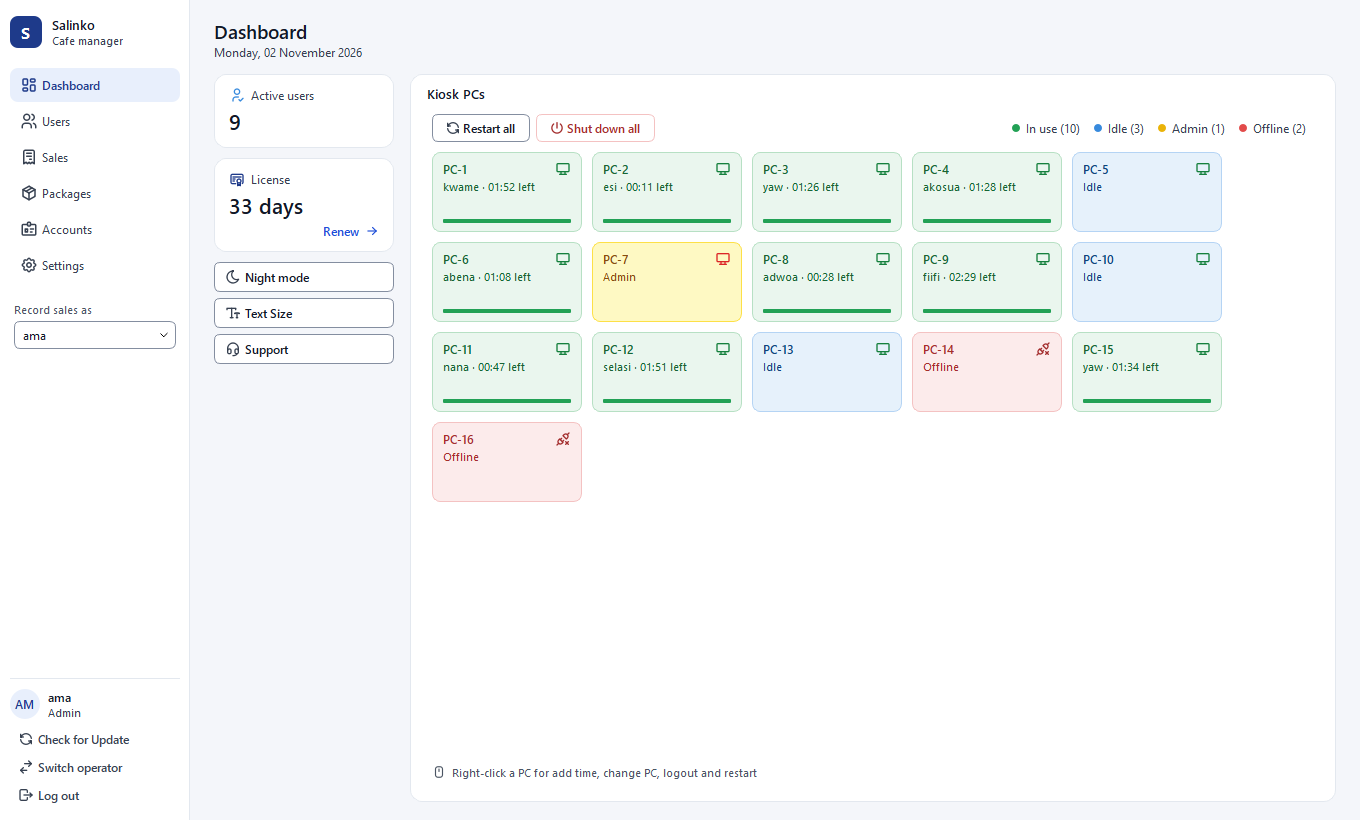
Every connected PC has a card. The colour tells you its state:
- Green, In use: a customer is signed in. The card shows who and how much time is left; the bar shrinks as time runs out.
- Blue, Idle: the PC is on and locked, waiting for a customer.
- Yellow, Admin: someone is signed in to that PC's own Settings.
- Red, Offline: the PC is off or can't reach the manager.
If you use Deep Freeze, the small PC icon is green when the PC is frozen and red when it is thawed.
Right-click a PC to add time, move the customer to another PC (Change PC), log them out, restart the PC, or thaw and freeze it with Deep Freeze. Right-click an offline PC to Wake Up (the PC needs Wake-on-LAN switched on in its BIOS). Restart all and Shut down all act on every connected PC.
The tiles on the left show the number of active users and the days left on the license. Night mode, Text Size and Support are below them.
5. Users (customers)
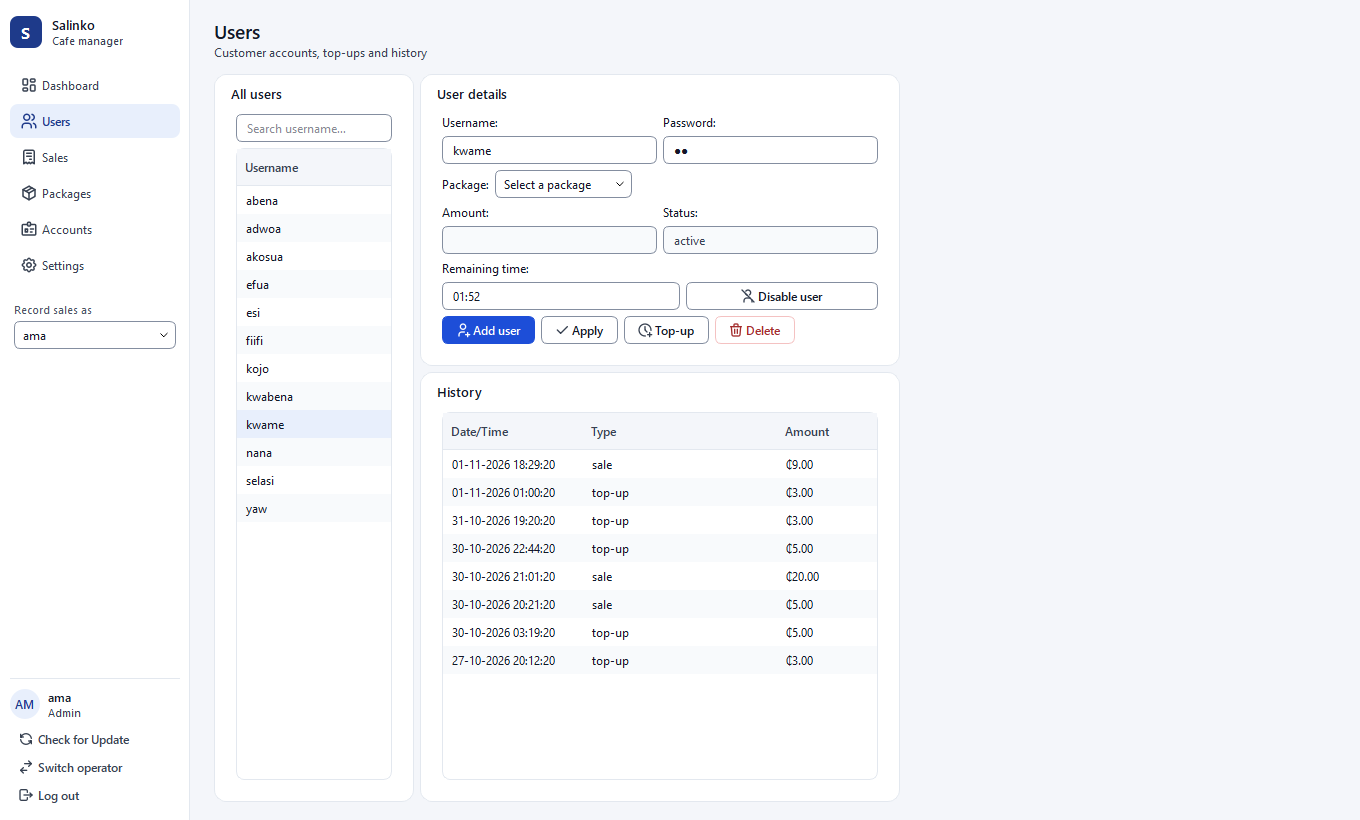
- Type a username and password, choose a package, and click Add user. The sale is recorded under the operator shown at Record sales as.
- The customer signs in on any idle PC with that username and password.
- To add time later, select the customer and click Top-up. It works while they are playing.
Enable / disable user blocks or allows an account, Apply saves edits to the username, password or remaining time, and Delete removes the account. The History table lists everything that customer bought.
6. Packages
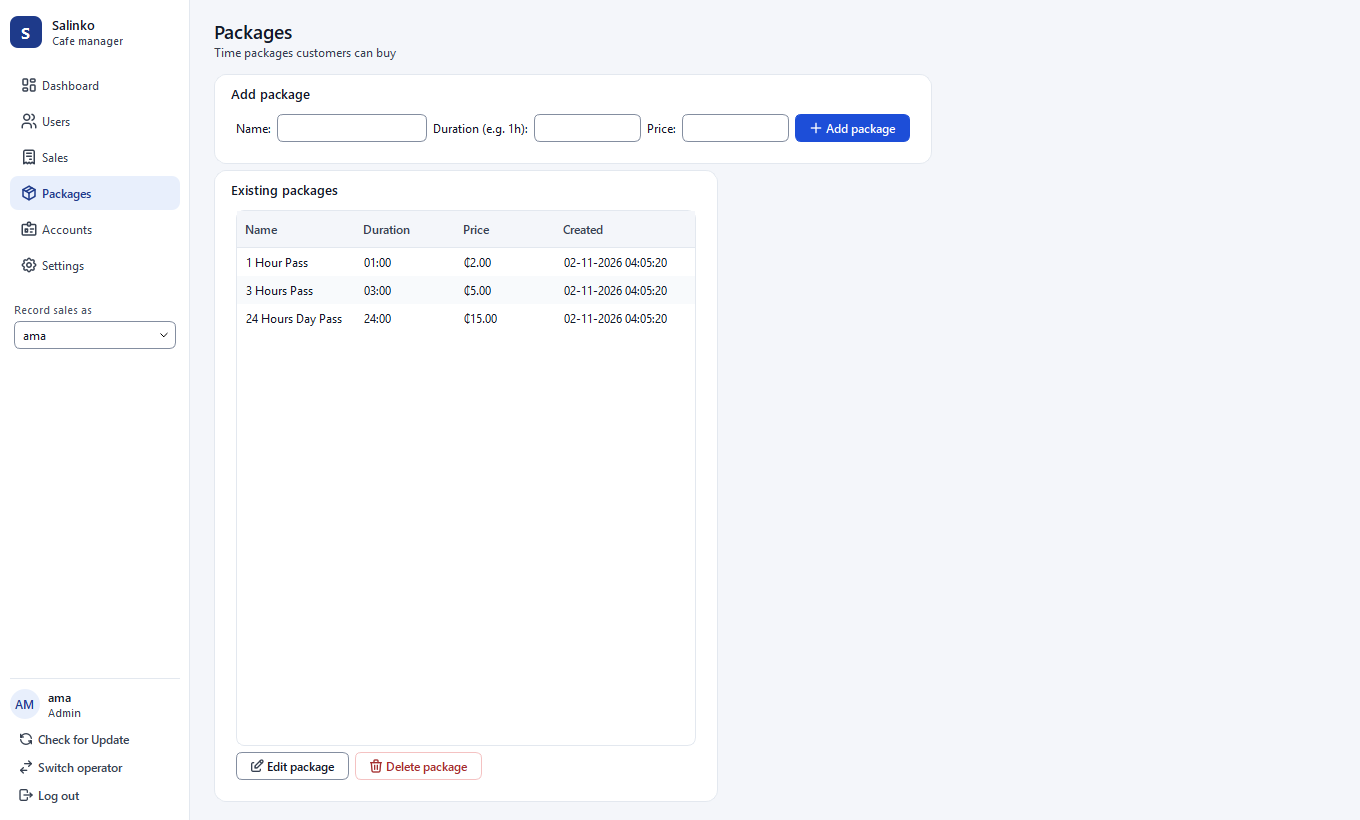
A package is an amount of time and its price. Enter a name, the duration (for example 1h, 30m or 1h30m) and the price, then click Add package. Select a package to edit or delete it. Changing a price doesn't change sales already made.
7. Sales
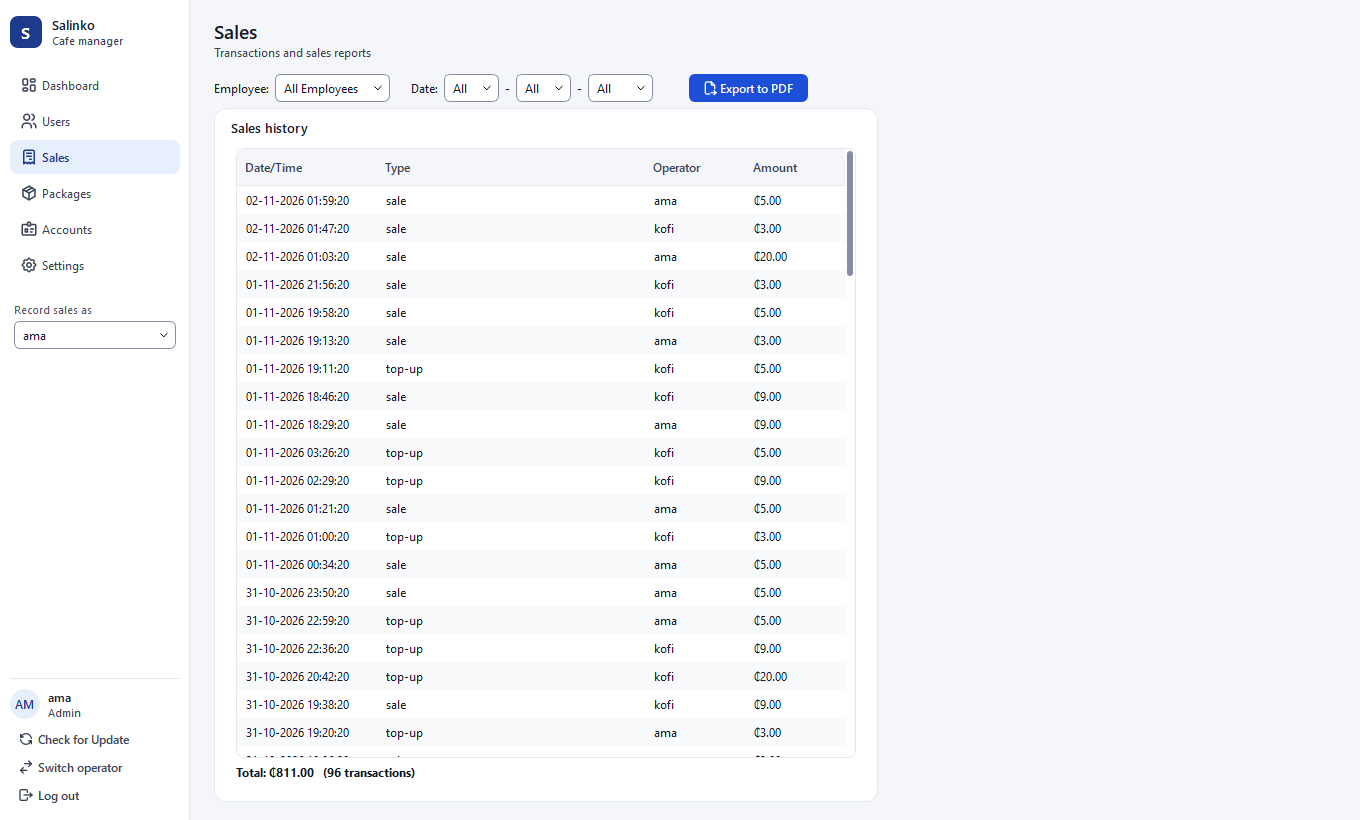
Every sale and top-up appears here with its time, type, the staff member and the amount. Use the Employee and Date filters to narrow the list; the total at the bottom follows the filter. Export to PDF saves what you see.
8. Staff accounts
Only Admins see Accounts. Add a login for each staff member and give it a role:
- Admin: everything, including Settings, Packages, Accounts and updates.
- Cashier: sells time, tops up and sees the Dashboard, Users and Sales.
Use Switch operator at the bottom of the side menu when the shift changes, and Log out when you leave the counter.
9. Mobile money on the customer PC
With kiosk payments switched on (Settings), customers can buy a package on the lock screen with MTN, Telecel or AirtelTigo mobile money. They confirm on their phone, the payment is checked, and the PC unlocks by itself. These sales are marked as online payments in Sales and are paid out to you; they are not part of the cashiers' cash report.
10. Settings
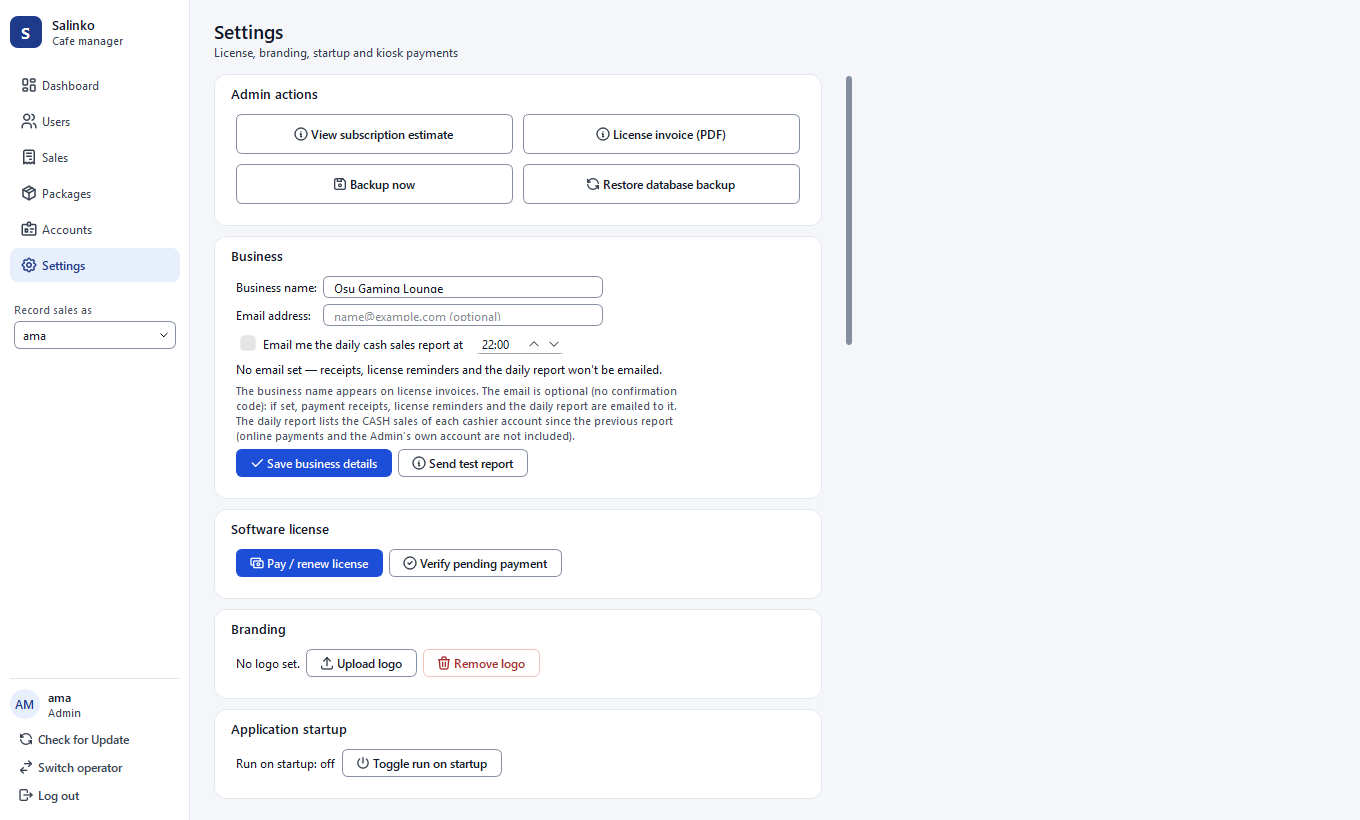
- Admin actions: see the license estimate, print a license invoice, Backup now, or Restore database backup. A backup is also made automatically every day.
- Business: name, email address and the time the daily cash report is emailed. Send test report checks that email works.
- Software license: pay or renew, and check a payment that hasn't shown up yet.
- Branding: upload your logo for the side menu.
- Application startup: start the PC Manager with Windows so the customer PCs always have something to connect to.
11. License
The license runs in 30-day periods. Its fee is 4% of the sales recorded in that period. Five days before the end the app reminds you; if the period ends unpaid, the PC Manager locks until it is paid.
To pay, click Renew on the License tile or Pay / renew license in Settings. A secure checkout opens inside the app: choose mobile money or card and follow the steps. Don't close the window while the payment is processing. The app unlocks by itself as soon as the payment is confirmed and emails a receipt if you set an email address.
12. Updates
Admins see Check for Update at the bottom of the side menu. It asks this website for the newest version and, if there is one, shows what's new.
- Click Download and install. The file is downloaded and its fingerprint is checked, so a damaged download is never run.
- The installer opens and the app closes. Approve the Windows prompt and finish the installer.
- Open Salinko Cafe again. Your customers, sales and settings are all still there.
Customer PCs are updated by running the newest installer from cafe.salinkotec.com/download and choosing Lockscreen again.
13. Help
The Support button on the Dashboard has our contacts. You can also reach us on:
- WhatsApp: 024 889 5821
- Email: salinkotec@gmail.com
- TikTok: @salinkotech
When you write, include what you clicked and what you saw. A photo of the screen helps.